Tips & Tricks: Anatomy of Fabric
Often, while reading patterns, using die cutters, laying out patterns before cutting, and doing other general sewing and quilting things, fabric anatomy gets brought up. Don’t get too caught up by the lingo, as it seems a bit more complicated than it needs to be. Here’s some helpful definitions and also some diagrams (drawn by yours truly) that may help.
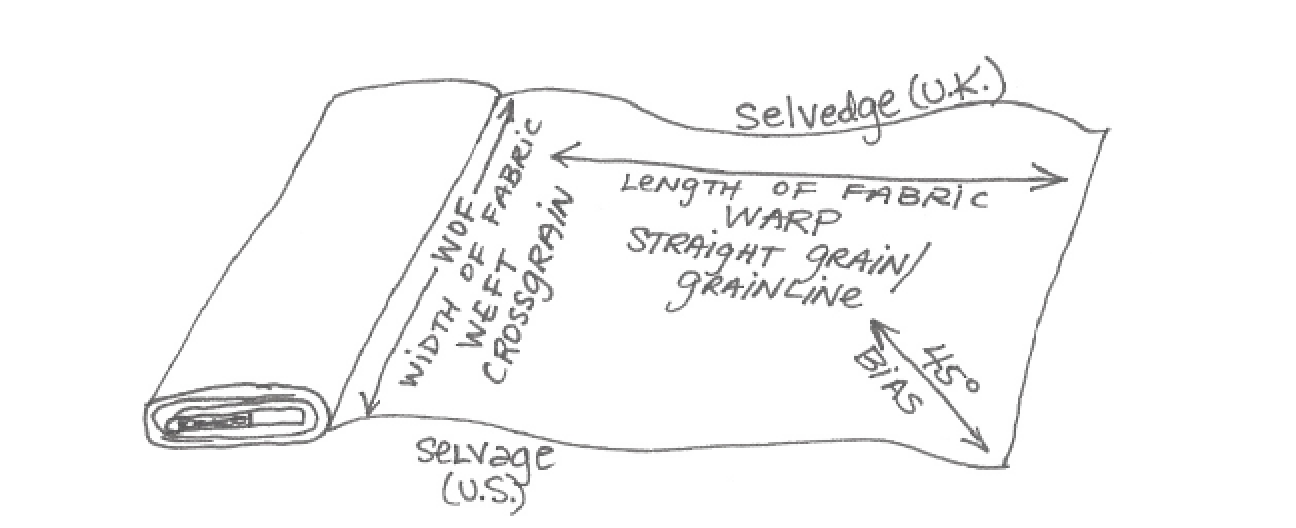
Length of Fabric – Typically, in sewing and quilting, fabric is manufactured and placed onto rolls or bolts. From there it gets cut down into smaller pieces either by someone at the store to cut you yardage, to make pre-cuts or by you, if you purchase the whole bolt. If a pattern says to cut this by “length of fabric,” they mean this direction….as if it was straight off of the bolt. The selvage runs along the edge of the fabric parallel to the length of fabric. It can be as long as you like, as long as there’s enough fabric on the bolt. Fun Fact: Generally, fabric tends to come on a bolt with a length of 40 yards or 100 yards. Also, for all you history buffs, a “bolt” is a sailing term, and specifically refers to canvas for sails. In that usage, a “bolt” is a unit of measurement….39 yards of sailing canvas, to be precise. Who knew?
Width of Fabric – also referred to as W.O.F. or WOF. The width of fabric varies greatly from manufacturer to manufacturer and also varies with fabric type. Generally (and I use this term loosely!), quilting cotton comes in 42″-44″ and 108″ widths and garment fabric comes in 60″ widths.
Selvage/Selvedge – Selvage (the American spelling) and Selvedge (the U.K. spelling) refer to the edges of the fabric that sometimes look a little funny. Typically in quilting cottons, the one side of the selvage is white and usually has pertinent information printed on it, like Manufacturer and Designers name, the name of the fabric collection, the colors used in printed the fabric, etc. The opposite side of the selvage has tiny little holes in it and is sometimes a bit stiff. The selvage is used to stretch the fabric onto the “loom” during the manufacturing process (hence the tiny little holes). Why do we need it? Well it’s helpful to have the Fabric info sometimes and, more importantly, it helps identify the length and width of the fabric, and the grain at the same time. Remember: The length of Fabric always runs parallel to the selvage.
Grain of Fabric – The grain refers to the direction of the little strings that are woven together to make the fabric. This is very important as all three directions (see below) have their own characteristics. Always follow the directions when cutting, laying out or sewing, as using the incorrect grain can really ruin your end result. Look below for more information about these. Please also see Length of Fabric and Width of Fabric for more information.
Lengthwise Grain/Straight of Grain/Grain Line/Warp – The Lengthwise Grain are the fibers that create the foundation of the fabric. These are always PARALLEL to the selvage. (Remember back to school: Parallel is the two train tracks that never touch, but run next to each other…..) The Straight of Grain has the LEAST amount of stretch of all the directions of fabric. Generally, garments are cut with the straight grain running top to bottom, but always follow your pattern’s direction. Think of this: If you made a garment that didn’t have the straight grain running top to bottom and you put a hem on it, the weight of the hem could stretch the garment and cause it to droop. Sometimes you want the droop, but for a structured garment, you would not. Often when cutting fabric with a die cutter, you want to pay attention to this grain line as well to avoid distortion of your pieces.
Crosswise Grain/Crossgrain/Weft – The Crosswise Grain are the fibers that fill-in the foundational lengthwise grain fibers. These are always PERPENDICULAR to the selvage. (Remember back to school: Perpendicular lines form a right (90 degree) angle, just like a wall would to the floor…..or like a capital “T”) The Crossgrain has stretch to it. Often, garments are cut with the crossgrain parallel to the floor to create stretch around the wearer. Think of this: If you had a pant leg, you would not want the crossgrain to run up and down the leg, as this would cause the hem to stretch constantly, and your pants would be too long. However, if you had the crossgrain run around your leg, it would offer you some stretch when you went up stairs, or sat down or walked, etc.
Bias/Bias Grain/True Bias – The Bias Grain is any thing cut between the warp and the weft. The “True Bias” is a diagonal cut at 45 degrees. Fabric on the bias is the most elastic and fluid than in any other direction. This is used for things like piping, neckties and bias-cut skirts. Bias-cut garments drape the most and fit with the most stretch. Think of the flowy, pencil style gowns of the 1920’s…..these have that gorgeous drape because of the bias cut…note that you won’t see a heavily beaded hem or anything like that….it would distort the garment. In quilting, one needs to be wary of bias cuts when sewing triangles. If you aren’t careful, you will distort your block and you will not get a straight seam. Bias tape is often used in binding. It helps because the binding will stretch as you work with it and be flexible when you fold or roll the quilt. You definitely want this if you are binding scalloped edges.
How to find the Grainline:
Ok, here’s quandary Number 1: I found a large scrap of fabric, but it has no selvedges on it. How do I find the grain??
Answer: Well…..start by looking at it. You should see fibers crossing over each other. At this point, you can determine that there’s grains…..but which one is which? Next, try holding the fabric and stretching it along those fibers. It will stretch more in one direction than the other. The direction with the least amount of stretch is the Straight of Grain.
Quandary Number 2: I have to cut a very long length (let’s say you need to cut sashing or a border for a quilt) but I need it to be along the grain line so that my finished quilt top isn’t distorted. (Yes!! This is why your quilt isn’t laying flat at the end of the day!) How do I ensure that I cut this border whilst keeping it along the grainline for the whole of the cut?
Answer: The simplest way is to cut right along the selvedge, but that’s not always possible. I know you will hate me for saying this, but the quickest and easiest way to ensure that you are cutting along the grainline is to snip a little edge of the fabric and tear it. Yup. I said it. Tear your fabric. Fabric rips naturally along the grainline, so it will smoothly rip along the perfect edge for the whole length. Often you will find that fabric gets stretched and distorted when it gets rolled onto the bolt, so when you have fabric cut at the store, it often isn’t actually a straight edge to cut from. Be sure to check your grains BEFORE you start cutting fabric. You may need to “square it up” before you start to ensure that it stays square as you are working with it. Remember that accurate cutting leads to accurate sewing and you can’t have either if your fabric is catawampus to start with.
What other questions do you have regarding Fabric Anatomy?? Let me know! As always, if you have a question/topic that you’d like me to answer on this forum, please send me a message or comment below and I’ll add it to the Topic Queue!